OV13855 Camera Adaptation Guide Based on the OK1126B-S / OK1126BJ-S Linux 6.1.141 Buildroot Platform
Overview
In embedded vision projects, camera adaptation is often a critical aspect of system development. The entire process involves multiple layers of collaboration across the kernel, file system, and user-space applications—from enabling underlying drivers, configuring device trees and the kernel, to deploying IQ files, starting 3A services, and finally verifying video preview, photo capture, and video recording. For practical project development, only when this entire chain is fully functional can a camera solution be considered ''successfully adapted.''
This article outlines the adaptation process for the OV13855 camera module based on the OK1126B-S / OK1126BJ-S Linux 6.1.141 Buildroot platform. It covers the following key areas: kernel configuration, patch application, file system preparation, verification of the rkaiq service, and testing of camera functionality. This comprehensive guide serves as a reference for similar future projects.
Note: This solution is modified based on
OK1126B-S&OK1126BJ-S_Linux6.1.141_User_Materials_R1.Specific modifications can be reviewed in the relevant documentation.
Operation Steps:
1. Kernel configuration
Verify whether the kernel includes the following configurations; add them if they are missing.Configuration file path: kernel/arch/arm64/configs/OK1126B-S-linux_defconfig
CONFIG_VIDEO_OV13855=y
CONFIG_VIDEO_TECHPOINT=y
Execute the following command in the SDK’s kernel directory to apply the corresponding patch:
patch -p1 < ov13855_tp2855.diff
2. Filesystem
Place the IQ file for the 13855 camera, ov13855_CMK-OT2016-FV1_default.json, into the /etc/iqfiles directory on the development board.
Additionally, verify whether the rkaiq process is enabled.
root@OK1126B-buildroot:~# ps -ef | grep rkaiq
root 1042 1 0 Jan24 ? 00:00:00 /bin/sh -c /usr/bin/rkaiq_3A_server 2>&1 | logger -t rkaiq_3A
root 1044 1042 0 Jan24 ? 00:00:01 /usr/bin/rkaiq_3A_server
root 1045 1042 0 Jan24 ? 00:00:00 logger -t rkaiq_3A
root 1923 1075 0 00:23 ttyFIQ0 00:00:00 grep --color=auto rkaiq
If the process is not running, you need to start the rkaiq process.
root@OK1126B-buildroot:~# /etc/init.d/S40rkaiq_3A start
Note: When executing the following statements, the OV13855 camera must be connected to the 4-lane MIPI-CSI interface on the outer side of the development board (P9), otherwise the process will not be visible.
Camera Testing
1. Check Camera Nodes
v4l2-ctl --list-devices
After running the command, the output should include the following segment:
rkisp_mainpath (platform:rkisp-vir0):
/dev/video23
/dev/video24
/dev/video25
/dev/video26
/dev/video27
/dev/video30
/dev/media3
rkisp_mainpath (platform:rkisp-vir1):
/dev/video31
/dev/video32
/dev/video33
/dev/video34
/dev/video35
/dev/video38
/dev/media4
(Where /dev/video23 corresponds to the outer camera (P9) and /dev/video31 corresponds to the inner camera (P8).)
The following steps use /dev/video23 as an example.
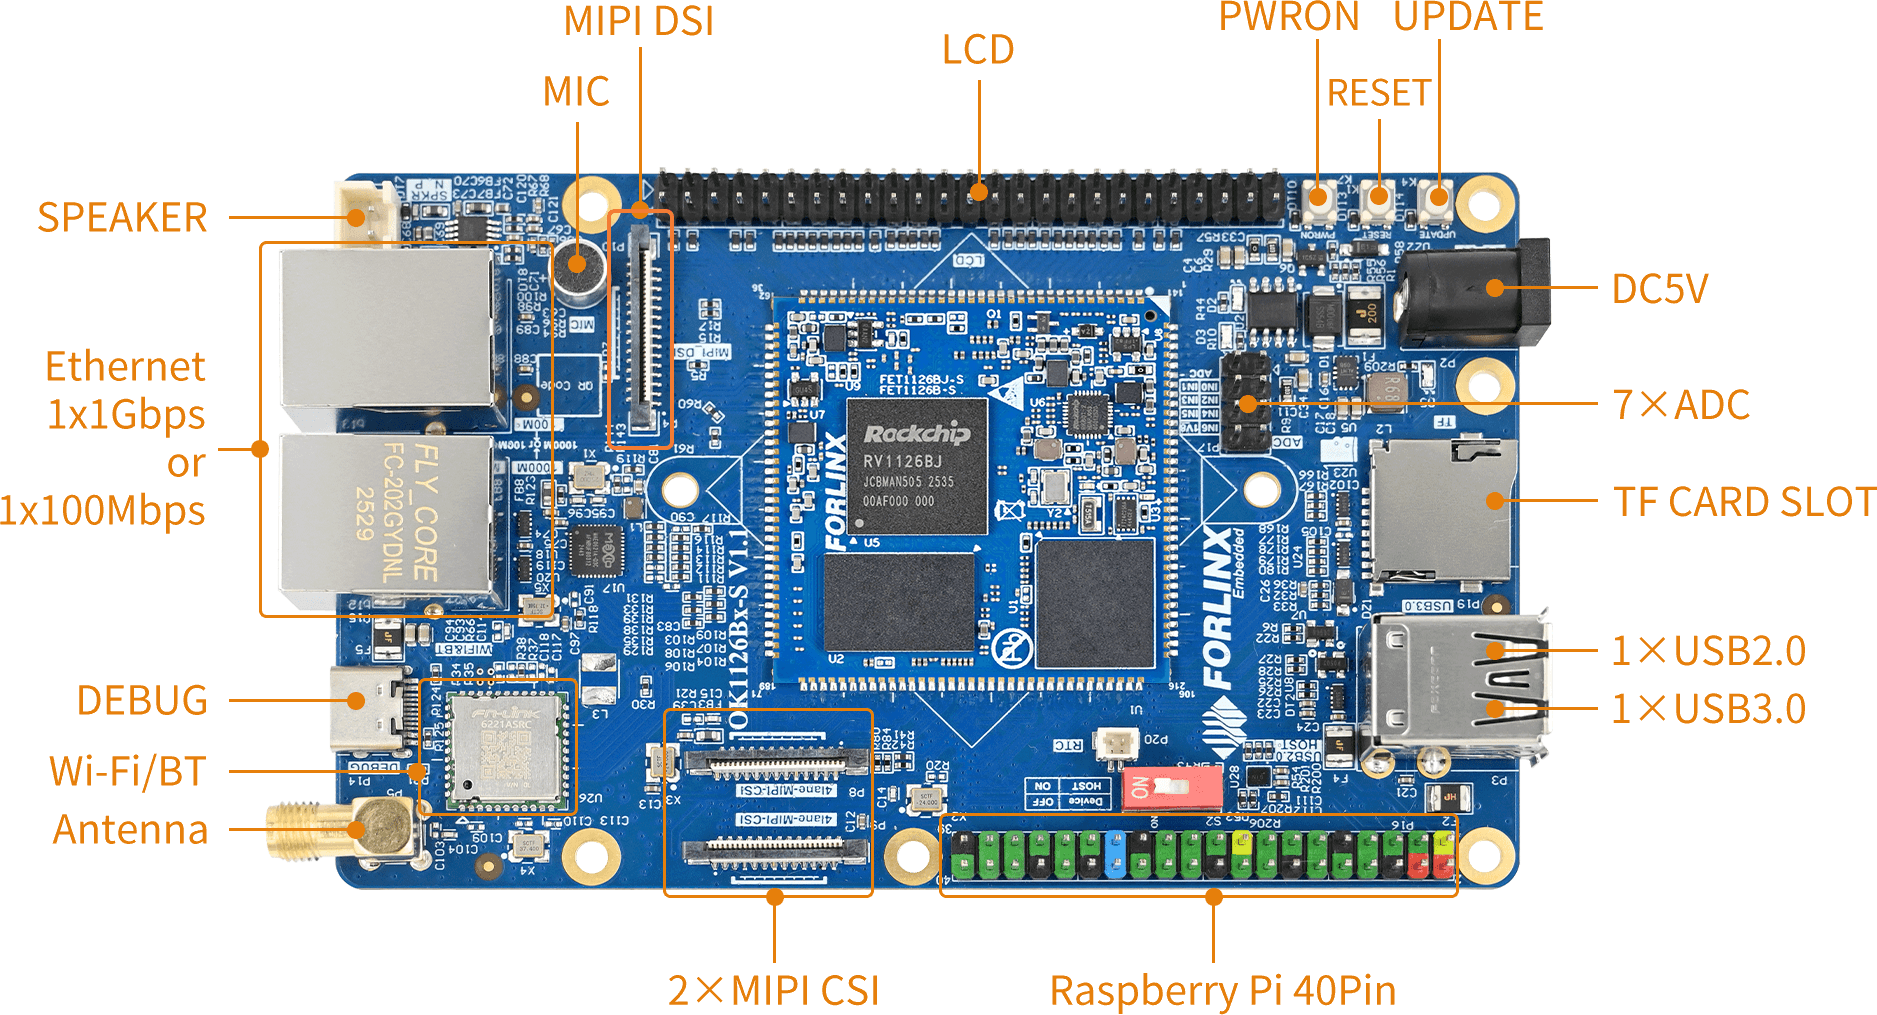
OK1126B Development Board Interface Diagram
2. Check Supported Formats and Resolutions
v4l2-ctl --list-formats-ext -d /dev/video23
3. Camera Preview
gst-launch-1.0 v4l2src device=/dev/video23 ! video/x-raw, format=NV12, width=640, height=480, framerate=30/1 ! waylandsink
4. Capture a Photo
gst-launch-1.0 v4l2src device=/dev/video23 num-buffers=1 ! video/x-raw,format=NV12,width=640,height=480 ! mppjpegenc ! filesink location=pic.jpg
Check whether pic.jpg is generated. You can copy it to a PC for viewing.
5. Record H.264 Video
gst-launch-1.0 v4l2src device=/dev/video23 num-buffers=100 ! video/x-raw,format=NV12, width=640,height=480 ! tee name=t ! queue ! mpph264enc ! queue ! h264parse ! qtmux ! filesink location=13855_h264.mp4 t. ! queue ! waylandsink
6. Play H.264 Video
gst-launch-1.0 filesrc location=13855_h264.mp4 ! qtdemux ! queue ! h264parse ! mppvideodec ! waylandsink
Adapting the OV13855 camera module on the OK1126B-S / OK1126BJ-S Linux 6.1.141 Buildroot platform involves several important steps. It requires not only configuring the kernel and integrating patches but also deploying the IQ file, activating the rkaiq service, and verifying functionality through V4L2/GStreamer tests. Only after completing these steps can the entire image acquisition pipeline be fully operational.
This guide emphasizes that camera adaptation goes beyond simply compiling the driver into the kernel. It is crucial to ensure that the underlying driver, image signal processor (ISP), artificial intelligence algorithms (AIQ), and user-space applications work together seamlessly. For embedded vision projects, this comprehensive approach to adaptation is more aligned with real-world development and offers greater engineering reference value.